Module: Hanging Protocol
Overview
Hanging protocols are an essential part of any radiology viewer. OHIF uses Hanging Protocols to handle the arrangement of the images in the viewport. In short, the registered protocols will get matched with the DisplaySets that are available. Each protocol gets a score, and they are ranked. The winning protocol (highest score) gets applied and its settings run for the viewports to be arranged.
In OHIF-v3 hanging protocols you can:
- Define what layout the viewport should starts with (e.g., 2x2 layout)
- Specify the type of the viewport and its orientation (e.g., stack, volume with Sagittal view)
- Define which displaySets gets displayed in which viewport of the layout (e.g,. displaySet that has modality of 'CT' and 'SeriesDescription' of 'Coronary Arteries' gets displayed in the first viewport of the layout)
- Apply certain initial viewport settings (e.g., inverting the contrast, jumping to a specific slice, etc.)
- Add specific synchronization rules for the viewports (e.g., synchronize the zoom of the viewports of the index 1, 2 OR synchronize the VOI of the viewports of the index 2, 3)
Using hangingProtocolModule you can provide/register the protocols for OHIF to
utilize.
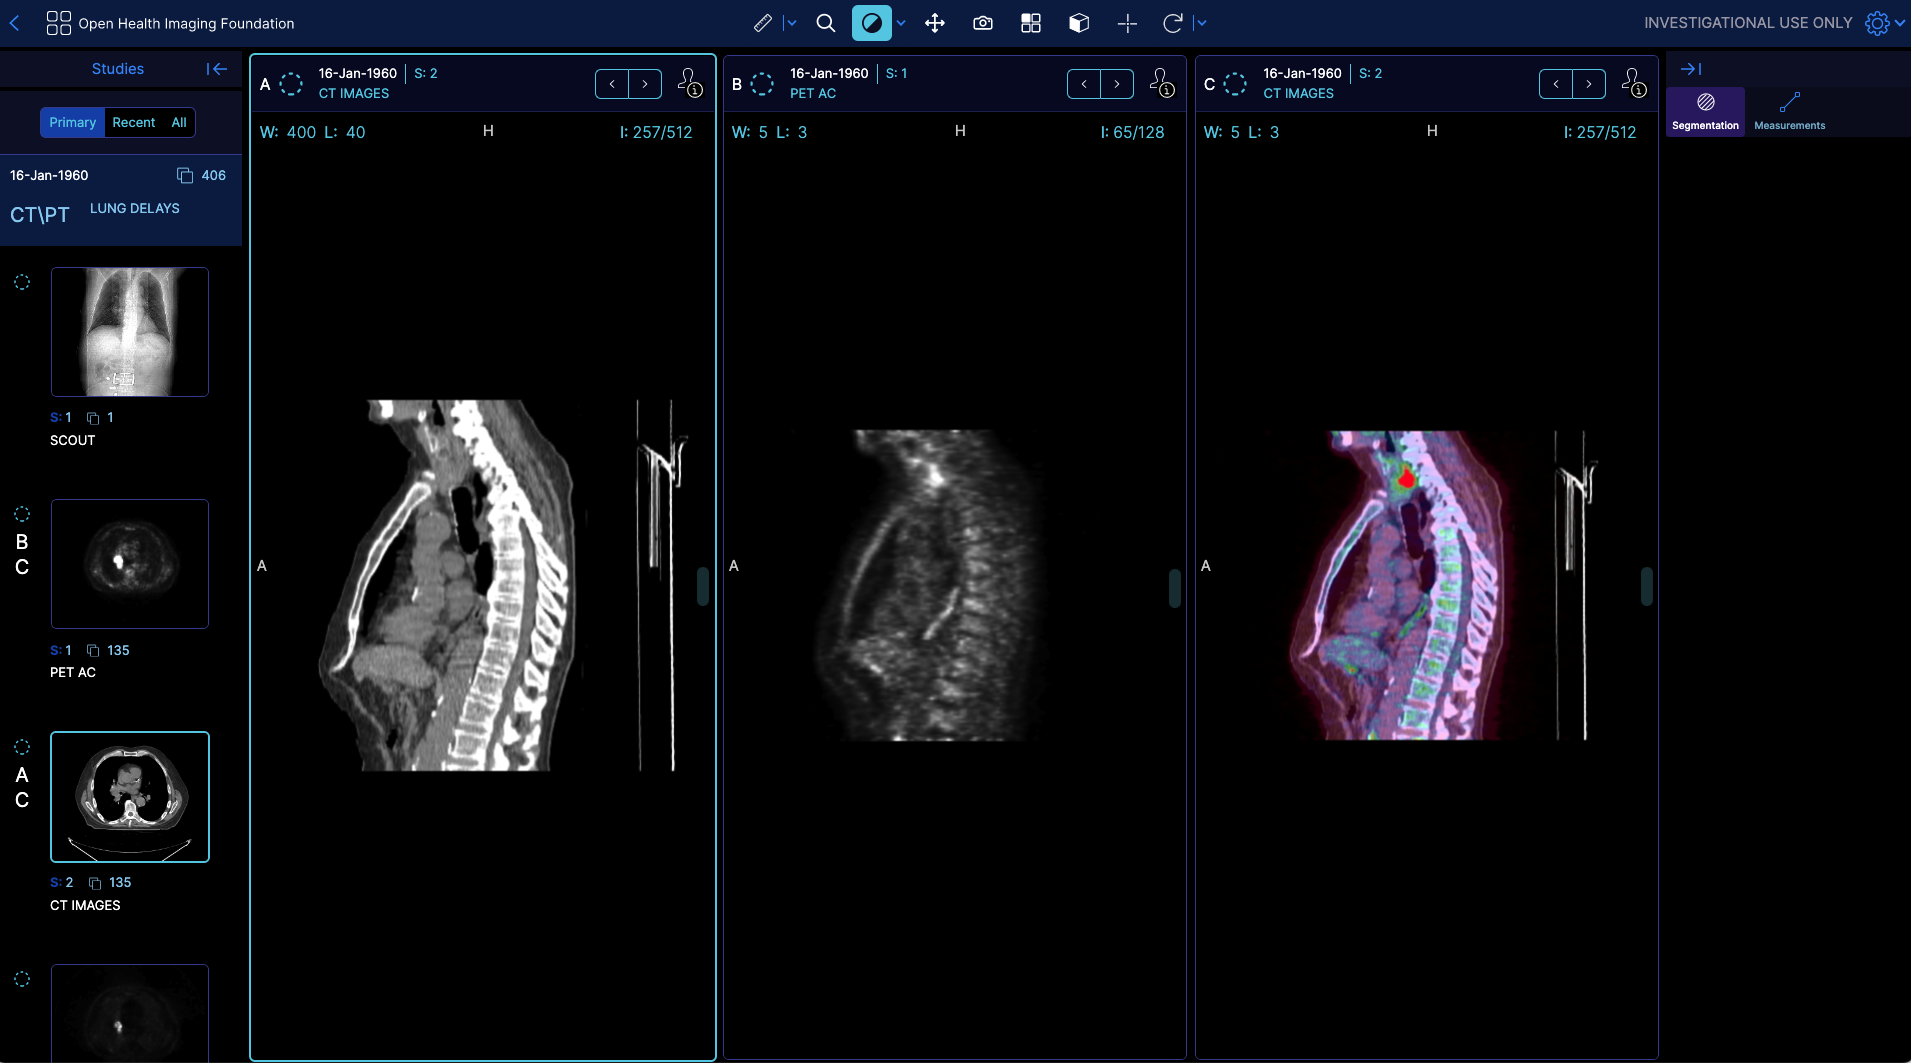
Here is an example protocol which if used will hang a 1x3 layout with the first viewport showing a CT image, the second viewport showing a PT image and the third viewport showing their fusion, all in Sagittal orientations to achieve a view of
const oneByThreeProtocol = {
  id: 'oneByThreeProtocol',
  locked: true,
  hasUpdatedPriorsInformation: false,
  name: 'Default',
  createdDate: '2021-02-23T19:22:08.894Z',
  modifiedDate: '2022-10-04T19:22:08.894Z',
  availableTo: {},
  editableBy: {},
  imageLoadStrategy: 'interleaveTopToBottom',
  protocolMatchingRules: [
    {
      attribute: 'ModalitiesInStudy',
      constraint: {
        contains: ['CT', 'PT'],
      },
    },
  ],
  displaySetSelectors: {
    ctDisplaySet: {
      seriesMatchingRules: [
        {
          weight: 1,
          attribute: 'Modality',
          constraint: {
            equals: {
              value: 'CT',
            },
          },
          required: true,
        },
        {
          weight: 1,
          attribute: 'isReconstructable',
          constraint: {
            equals: {
              value: true,
            },
          },
          required: true,
        },
      ],
    },
    ptDisplaySet: {
      seriesMatchingRules: [
        {
          attribute: 'Modality',
          constraint: {
            equals: 'PT',
          },
          required: true,
        },
        {
          weight: 1,
          attribute: 'isReconstructable',
          constraint: {
            equals: {
              value: true,
            },
          },
          required: true,
        },
        {
          attribute: 'SeriesDescription',
          constraint: {
            contains: 'Corrected',
          },
        },
      ],
    },
  },
  stages: [
    {
      id: 'hYbmMy3b7pz7GLiaT',
      name: 'default',
      viewportStructure: {
        layoutType: 'grid',
        properties: {
          rows: 1,
          columns: 3,
        },
      },
      viewports: [
        {
          viewportOptions: {
            viewportId: 'ctAXIAL',
            viewportType: 'volume',
            orientation: 'sagittal',
            initialImageOptions: {
              preset: 'middle',
            },
            syncGroups: [
              {
                type: 'voi',
                id: 'ctWLSync',
                source: true,
                target: true,
              },
            ],
          },
          displaySets: [
            {
              id: 'ctDisplaySet',
            },
          ],
        },
        {
          viewportOptions: {
            viewportId: 'ptAXIAL',
            viewportType: 'volume',
            orientation: 'sagittal',
            initialImageOptions: {
              preset: 'middle',
            },
          },
          displaySets: [
            {
              id: 'ptDisplaySet',
            },
          ],
        },
        {
          viewportOptions: {
            viewportId: 'fusionSAGITTAL',
            viewportType: 'volume',
            orientation: 'sagittal',
            initialImageOptions: {
              preset: 'middle',
            },
            syncGroups: [
              {
                type: 'voi',
                id: 'ctWLSync',
                source: false,
                target: true,
              },
            ],
          },
          displaySets: [
            {
              id: 'ctDisplaySet',
            },
            {
              options: {
                colormap: 'hsv',
                voi: {
                  windowWidth: 5,
                  windowCenter: 2.5,
                },
              },
              id: 'ptDisplaySet',
            },
          ],
        },
      ],
      createdDate: '2021-02-23T18:32:42.850Z',
    },
  ],
  numberOfPriorsReferenced: -1,
};


function getHangingProtocolModule() {
  return [
    {
      id: 'oneByThreeProtocol',
      protocol: oneByThreeProtocol,
    },
  ];
}
Skeleton of a Protocol
The skeleton of a hanging protocol is as follows:
Id
unique identifier for the protocol, this id can be used inside mode configuration to specify which protocol should be used for a specific mode. A mode can request a protocol by its id (which makes OHIF to apply the protocol without matching), or provides and array of ids which will make the ProtocolEngine to choose the best matching protocol (based on protocolMatching rules, which is next section).
imageLoadStrategy
The image load strategy specifies a function (by name) containing logic to re-order the image load requests. This allows loading images viewed earlier to be done sooner than those loaded later. The available strategies are:
- interleaveTopToBottom to start at the top and work towards the bottom, for all series being loaded
- interleaveCenter is like top to bottom but starts at the center
- nth is a strategy that loads every nth instance, starting with the center and end points, and then filling in progressively all along the image. This results in partial image view very quickly.
protocolMatchingRules
A list of criteria for the protocol along with the provided points for ranking.
weight: weight for the matching rule. Eventually, all the registered protocols get sorted based on the weights, and the winning protocol gets applied to the viewer.attribute: tag that needs to be matched against. This can be either Study-level metadata or a custom attribute such as "StudyInstanceUID", "StudyDescription", "ModalitiesInStudy", "NumberOfStudyRelatedSeries", "NumberOfSeriesRelatedInstances" In addition to these tags, you can also use a custom attribute that you have registered before. We will learn more about this later.
constraint: the constraint that needs to be satisfied for the attribute. It accepts avalidatorwhich can be [equals,doesNotEqual,contains,doesNotContain,startsWith,endsWidth]A sample of the matching rule is above which matches against the study description to be PETCT
{
  id: 'wauZK2QNEfDPwcAQo',
  weight: 1,
  attribute: 'StudyDescription',
  constraint: {
    contains: {
      value: 'PETCT',
    },
  },
  required: false,
},
displaySetSelectors
Defines the display sets that the protocol will use for arrangement.
  displaySetSelectors: {
    ctDisplaySet: {
      seriesMatchingRules: [
        {
          weight: 1,
          attribute: 'Modality',
          constraint: {
            equals: {
              value: 'CT',
            },
          },
          required: true,
        },
        {
          weight: 1,
          attribute: 'isReconstructable',
          constraint: {
            equals: {
              value: true,
            },
          },
          required: true,
        },
      ],
    },
    ptDisplaySet: {
      seriesMatchingRules: [
        {
          attribute: 'Modality',
          constraint: {
            equals: 'PT',
          },
          required: true,
        },
        {
          weight: 1,
          attribute: 'isReconstructable',
          constraint: {
            equals: {
              value: true,
            },
          },
          required: true,
        },
        {
          attribute: 'SeriesDescription',
          constraint: {
            contains: 'Corrected',
          },
        },
      ],
    },
  }
As you see above we have specified two displaysets: 1) ctDisplaySet , 2) ptDisplaySet The ctDisplaySet will match against all the series that are CT and reconstructable The ptDisplaySet will match against all the series that are PT and reconstructable.
As you see each selector is composed of an id as the key and a set of seriesMatchingRules (displaySetMatchingRules) which gives score to the displaySet
based on the matching rules. The displaySet with the highest score will be used for the id.
stages
Each protocol can define one or more stages. Each stage defines a certain layout and viewport rules. Therefore, the stages property is array of objects, each object being one stage.
viewportStructure
Defines the layout of the viewer. You can define the number of rows and columns. There should be rows * columns number of
viewport configuration in the viewports property. Note that order of viewports are rows first then columns.
viewportStructure: {
    type: 'grid',
    properties: {
      rows: 1,
      columns: 2,
      viewportOptions: [],
    },
},
In addition to the equal viewport sizes, you can define viewports to span multiple rows or columns.
viewportStructure: {
    type: 'grid',
    properties: {
      rows: 1,
      columns: 2,
      viewportOptions: [
        {
          x: 0,
          y: 0,
          width: 1 / 4,
          height: 1,
        },
        {
          x: 1 / 4,
          y: 0,
          width: 3 / 4,
          height: 1,
        },
      ],
    },
},
viewports
This field includes the viewports that will get hung on the viewer.
viewports: [
  {
    viewportOptions: {
      viewportId: 'ctAXIAL',
      viewportType: 'volume',
      orientation: 'sagittal',
      initialImageOptions: {
        preset: 'middle',
      },
      syncGroups: [
        {
          type: 'voi',
          id: 'ctWLSync',
          source: true,
          target: true,
        },
      ],
    },
    displaySets: [
      {
        id: 'ctDisplaySet',
      },
    ],
  },
  // the rest
],
As you can see in the hanging protocol we defined three viewports (but only showing one of them right above). Each viewport has two properties:
viewportOptions: defines the viewport properties such asviewportId: unique identifier for the viewport (optional)viewportType: type of the viewport (optional - options: stack, volume - default is stackbackground: background color of the viewport (optional)orientation: orientation of the viewport (optional - if not defined for volume -> acquisition axis)toolGroupId: tool group that will be used for the viewport (optional)initialImageOptions: initial image options (optional - can be specific imageIndex number or preset (first, middle, last))syncGroups: sync groups for the viewport (optional)
displaySets: defines the display sets that are displayed on a viewport. It is an array of objects, each object being one display set.id: id of the display set (required)options(optional): options for the display set- voi: windowing options for the display set (optional: windowWidth, windowCenter)
- voiInverted: whether the VOI is inverted or not (optional)
- colormap: colormap for the display set (optional: 'hsv' etc.)
Custom attribute
For any matching rules you can specify a custom attribute too. For instance, if you have a timepoint attribute in for each of your studies, you can use that in the matching rules.
{
  id: 'wauZK2QNEfDPwcAQo',
  weight: 1,
  attribute: 'timepoint',
  constraint: {
    equals: {
      value: 'baseline',
    },
  },
  required: false,
},
and then you need to register a callback in the HangingProtocolService to get the value for the attribute.
HangingProtocolService.addCustomAttribute(
  'timepoint', // attributeId
  'addCustomAttribute', // attributeName
  study => { // callback that returns the value for the attribute
    const timePoint = fetchFromMyCustomBackend(study.studyInstanceUid);
    return timePoint;
  }
);
Matching on Prior Study with UID
Often it is desired to match a new study to a prior study (e.g., follow up on a surgery). Since the hanging protocols run on displaySets we need to have a way to let OHIF knows that it needs to load the prior study as well. This can be done by specifying both StudyInstanceUIDs in the URL. Below we are running OHIF with two studies
http://localhost:3000/viewer?StudyInstanceUIDs=1.3.6.1.4.1.25403.345050719074.3824.20170125095438.5&StudyInstanceUIDs=1.3.6.1.4.1.25403.345050719074.3824.20170125095722.1
Now you have access to both studies and you can use matchingRules to match displaySets.
Our roadmap includes enabling matching on prior studies without the UID (e.g., baseline, most recent and index).